Monday, May 11, 2015

Hero In a Half Shell: DIY Turtle Costume

Welcome to the last week of school for my precious five year old. This week, his teachers have basically decided to completely forgo all educational planning and essentially make this week a party everyday for the kids. Which I absolutely love. As a kid in school, what was better than counting down to summer? Why not countdown to summer with a fun different activity each day? Today is Super Hero Day!

Zander wasn't really sure what he wanted to be for a super hero. He's totally in LOVE with every super hero lately, so this was a hard pick for him. Finally he settled on Raphael. AKA the Red Teenage Mutant Ninja Turtle. He already had a mask. Technically we have two masks which turns into all 4 ninja turtle masks. They're reversible, so one mask has two colors. Boom. Awesome. We're partly there for the costume! What about the rest? Enter my rare creative DIY Mom side of my brain. Thus the need to share this with y'all. You're welcome.

Y'all. I'm not gonna lie. I'm super proud of how this turned out. You see, I refused to buy anything for this super hero day thing at school. Refused. I immediately started googling how I could make this costume for Zander.... and I immediately got discouraged. Most of what is online required things I didn't have around the house. (Like spray paint)... So I really had to get creative.

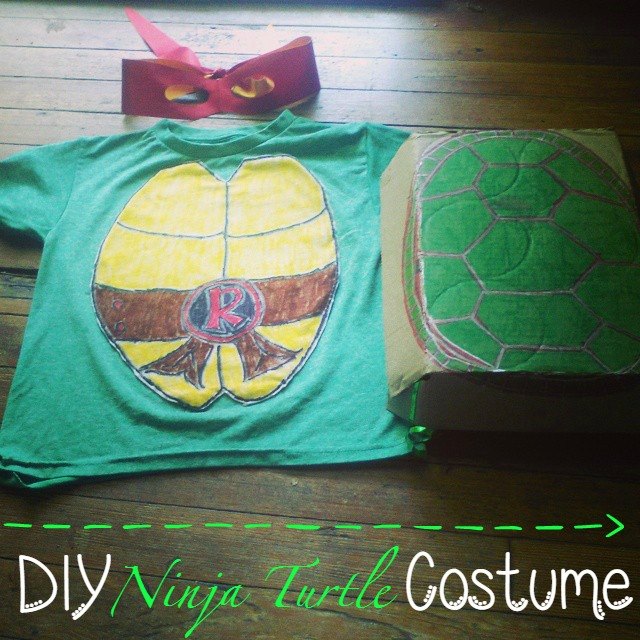
How I made Zander's costume!

Turtle Shell
What I used:
  1. Cardboard box insert
  2. Markers
  3. Ribbon
  4. Stapler 


What I did:
  • The insert was a rectangle. I drew the oval shaped turtle shell in the middle of the box. 
  • Using markers, I drew the shell pattern and colored it in. No, it's not perfect, but who cares? It's for a 5 year old. 
  • After coloring, I bent the edges of the box so it would form a shell-like shape. 
  • Holding where I folded, I stapeled it in place
  • Using Christmas curling ribbon, I strung it through the folds & formed a "back-pack" like method to where Zander could wear the shell on his back. 


Turtle Belly.
Y'all! Huge props to Amanda for this. When I was posting all over instagram the progress of the shell, she suggested how I could do the belly. I took that idea and ran with it!
What I used:
  1. Old white T-shirt (too small for Zander so he won't miss it)
  2. Markers
  3. Scissors
  4. Needle & Black Thread
  5. Pins

Because Amanda is a Genius and really helped me out. I had to share via Snapchat!

What I did:
  • With I pencil, I sketched the outline of a turtle shell belly on an old white t-shirt. (I used the help of a google search image to see what several looked like.) I combined the look of two different pictures into one. 
  • Using a black marker, I went over the sketch once I was happy with the design. 
  • Now color away to how you want your shell to look! 
  • Once I was happy with the look, I cut out the outline of the shell. Here, I cut out both the FRONT and BACK of the t-shirt. The idea here, was I didn't want it to fray, so I was planning to sew a little. 
  • Because I wanted to sew, I left some of the white on the edge. 
  • Here, I sewed by hand with a running stitch along the black outline. Once I was happy with it and satisfied there'd be no fraying, I cut the remaining white. 


To finish the look:
// I took Zander's green ninja turtles shirt and pinned the belly over the logo. This way, he looked green and didn't have to ruin his favorite turtle shirt!
// We put the "back-pack" shell on, and finished the look with the mask and khaki shorts!


What I love is that this can easily translate to a Halloween costume with long sleeves and pants. Plus, super easy! Literally, y'all I didn't even make my markers go dry coloring everything. I was pretty impressed by that.
Do you make your own costumes? I feel like this would've been easier if I had a sewing machine, but lucky for me my running stitch has improved while doing this! What do y'all think?
 photo featured sponsor2_zpsov6ixzlo.jpg

 photo TRLSigNov2014_zps7a838dc4.png

Wednesday, May 6, 2015

Fight The Green Eyed Monster!

Y'all, I'm not gonna lie. This post has been difficult for me to start. This week's Mamas Tell All topic is all about fighting the green eyed monster of jealousy. Jealousy is difficult to talk about. It exists. It's real. And to be honest if you claim to never felt jealousy toward anyone or anything, well then you're a big fat liar. #SorryNotSorry.

Mamas Tell All: A Weekly Linkup

Mom jealousy is a real thing. It may not be presented in a form that's totally obvious, but it's there. I'm totally guilty of this.

After Zander was born, I was having lunch with another new mom. She was talking about her child sleeping several hours at a time at night. Zander was not. I immediately felt the twinge of jealousy: "Ugh. Why isn't my son sleeping like that? They're practically the same age!" Instead of just saying how awesome that was and moving on, I couldn't let it go. I had to one-up her child sleeping. (I'm definitely not proud of this, y'all). "Zander is very close to rolling over." I bragged. Deep down, I knew I said it just to make her feel jealous.

It's stupid, y'all.

I saw this on facebook yesterday, and I kind of thought it was perfect to go with this post today:

So why do we do it? Why do we feel the need to feel like we're less of a mom just because someone else's kid can hit a baseball and mine can't? What do we do to end the cycle?

I can tell you what I've been doing. Praise them! The urge to one-up the other mom will probably be there. I feel like that might just be human nature. Fight that urge and praise the other mom for whatever they shared. She got a fancy new job or a promotion? Congradulate her with the utmost sincerity! Be genuine. Don't just say it because it's the right thing to do. Trust me here. Think about the last time you were really happy for someone. When you got a chance to praise them and tell them how happy you were for them. That made you feel pretty amazing, didn't it? It's the same thing. SURE, you may want the new house, new car, whatever. But secretly wishing that was you.... the jealousy... it's not helping anyone.

I kind of feel like to "fight the green-eyed monster" is to really act like a lady. Empower other women. Lift them up. This will catch on, and I can almost promise that as soon as you start lifting up other women, they will in turn lift you up as well.

How do you fight jealousy?
Linkup with us and share!
The Rambling Llama

Next week on Mamas Tell All:
May 13: Dating my Daughter/Son – spending special time on “dates” with our kids 
 photo featured sponsor2_zpsov6ixzlo.jpg

 photo TRLSigNov2014_zps7a838dc4.png

Friday, May 1, 2015

Llama Hair: Braided Headband Tutorial!

First of all, don't let the title scare y'all away today. You're still in the right place. You're still in the realm of the Llama. I just happen to be doing a hair tutorial today. I know, I'm just as shocked as you are!

Earlier this week, I shared on Instagram a fun easy braided headband. I originally saw this as a hair tutorial on facebook. You know, the ones where someone shared it and it plays a little as you scroll over it. So I thought I'd give it a try. Y'all... this is so super easy. Seriously, if I can do it, you can do it. And I can't even French Braid. So there's that.

I actually bit the bullet and filmed this for your viewing pleasure. Or not. Take your pick. If you're having trouble viewing it on the blog, head over to YouTube.
as always, props to YouTube for the best thumbnail, ever! 
See? So super simple! I'm not even sorry for all of the alliteration. Ha. I also realize the sound on my webcam is a bit wonky lately, so because I love y'all I'll break it down a little more for you.

Easy Braided Headband:
  • With clean, brushed hair - on either side of your head, just above your ears, separate enough strands of hair to make two braids. 
  • Keeping the hair for your braids away from the rest of your hair, pull back the rest of your hair into a semi high pony tail. Making sure the hair on the top of your head is relatively tight and secure. 
  • Now braid! Braid the hair on each side of your hair until you can't braid anymore. Secure with small hair ties. 
  • Taking a finished braid, cross it over to the opposite side of your head, starting to create the illusion of a headband. Secure with bobby pins. *I require a LOT. 
  • Repeat with the final braid. 
  • Now take down your pony tail and ruffle your hair to how you like it when you're wearing headbands. 
Ta-Da!! 

Totally simple, totally cute, and it absolutely keeps hair out of your face! Never waste money on headbands that hurt the back of your head again! Unless of course, your hair is too short. In that case, I'm sorry but I still love you.

If you try this, please let me know what you think! Also, in the comments below, tell me what you think at first glance! Happy Friday! I hope y'all enjoy your weekend!
xoxo! 
 photo featured sponsor2_zpsov6ixzlo.jpg

 photo TRLSigNov2014_zps7a838dc4.png